Evolution of a side garden with trash-bin screening
I like to show in-process pictures — not that garden making is ever about finishing a space — so here’s an update on a little-talked-about part of my garden: the front side-garden path, which leads from the circular driveway (out of view, upper right) to the gated side yard/utility area (behind us), where we store our trash bins, gardening supplies, and other not-so-pretty items.
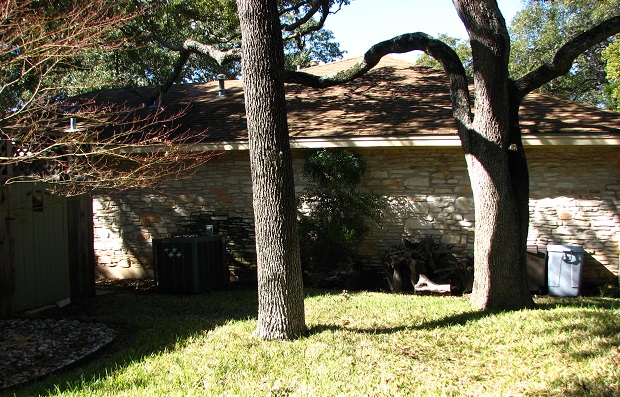
Here’s an unimproved view of this space from a few years ago, looking from our front walk over toward the neighbor’s house. The neighbor (a lovely person, by the way, and we all have these things, so no judgment) stored trash bins and tree trimmings alongside the house, out of view of her front door but highly visible from ours. The A/C unit stared us in the face too. Soon after we moved in, I had our wooden privacy fence extended toward the front of our house to create a storage space for our trash bins, but we still lacked a path for pulling the bins out to the driveway.
The thing about this area, pedestrian though it may be, is that our family uses and sees it daily, either when taking out the trash or simply walking to the front door. It’s also a space clearly visible to visitors as they walk to the front door. We needed screening and access, pronto.
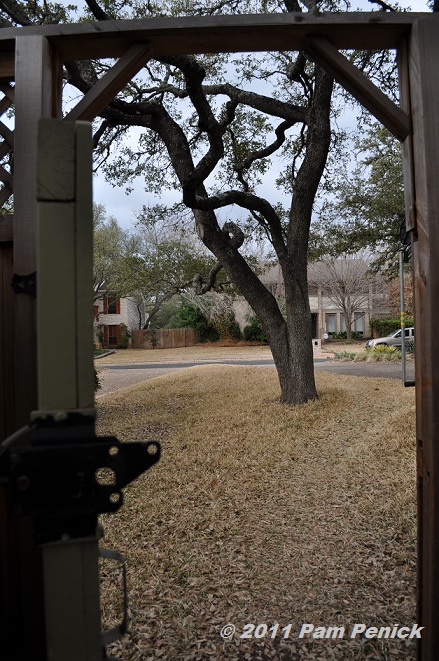
Also, considering how often we went in and out of the side-yard gate, I wanted a nicer view looking toward the street, not just a dull expanse of lawn punctuated by live oaks.
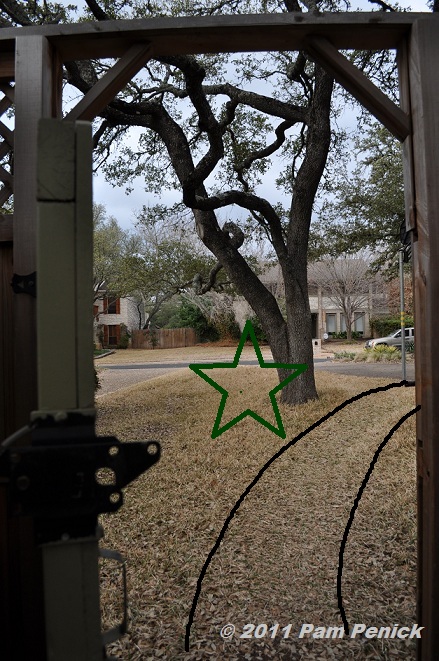
A curving path and a focal point to stop the eye from running straight to the cars parked along the street — that’s what we needed. That plus screening along the lot line.
For screening, a fence would have been the ideal solution (something like what I eventually had built along our other side yard), but I lacked the funds, plus I wasn’t sure how a short section of freestanding fence would look. So I opted for an affordable and DIY-able solution: a hedge.
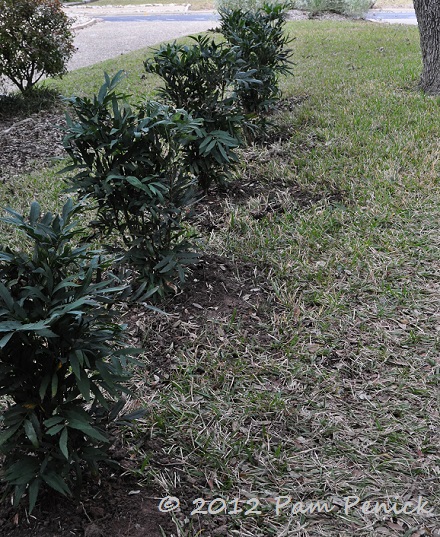
Evergreen, deer resistant, shade tolerant, and low growing (it tops out at about 4 feet tall and 3 feet wide), Chinese mahonia (Mahonia fortunei) fit the bill, so I planted a row of six shrubs 18 inches inside the property line. The downside, of course, is that a hedge is not an instant solution, and Chinese mahonia is slow growing. So I watered them, twiddled my thumbs, and waited.
But I couldn’t stand all that turf, plus I wanted to distract from the view of cars in the driveway next door. So a year later I ripped out most of the grass in the side yard, leaving only a small swath in front of the house, which I liked for negative space and also to avoid battling oak sprouts — i.e., suckering growth from live oaks that’s easier to mow down than clip out of a garden bed. (Some live oaks sucker more than others, and no, there’s nothing you can do to make it stop. Sorry. Never use herbicide, as they’re connected to the mother tree. Just clip them, mow them, or use a weed-eater on them.)
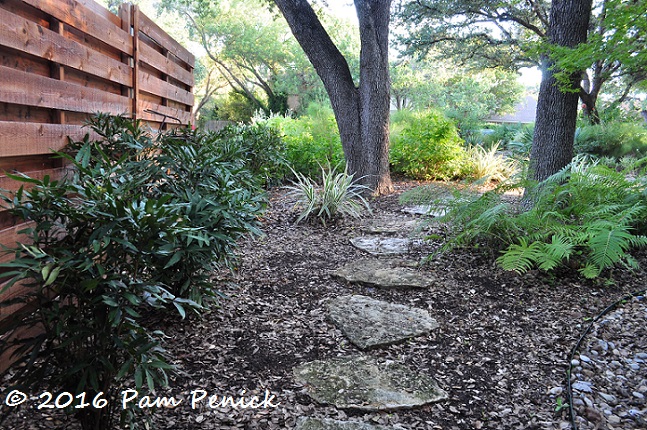
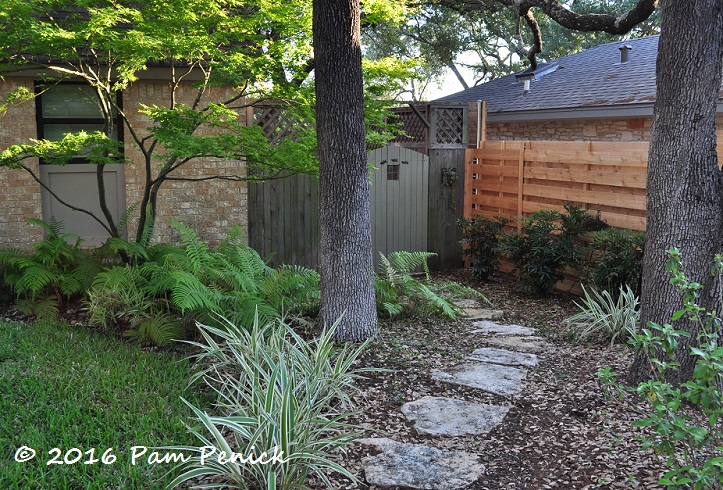
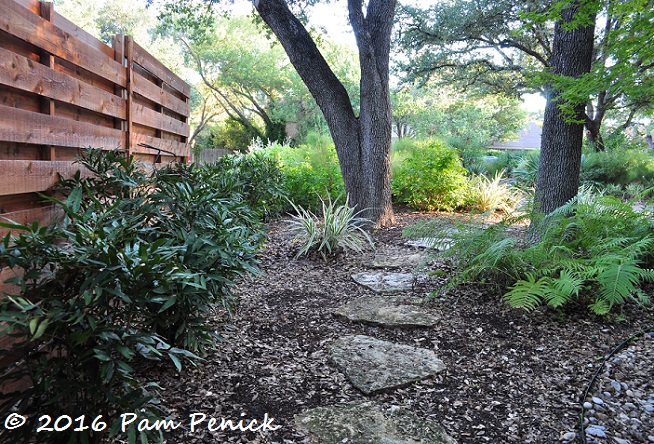
I added a curving flagstone path between the trees (with flagstones installed flush with the soil), which we use to pull our trash bins in and out. Spaced-out flagstones are less destructive to tree roots than a paved path would have been. Comparing this picture (newly planted) and the one above, you can see I also tweaked the line of the remaining tiny lawn, curving it in toward the Japanese maple. That gives the lawn a pleasing semicircular shape, and the expanded garden bed/path area looks more natural too.
Things were looking better. While the neighbor’s storage area wasn’t hidden, the growing garden was creating a green distraction, as well as a sense of enclosure for our own space.
A few years later, the house next door changed hands, and the new owners extended their privacy fence toward the front of their house, which sits closer to the street than ours does. The result? A wonderful new fence (and free!) for my own garden, which hides their utility area from view and creates a backdrop for the Chinese mahonia.
OK, one more look at the “before.”
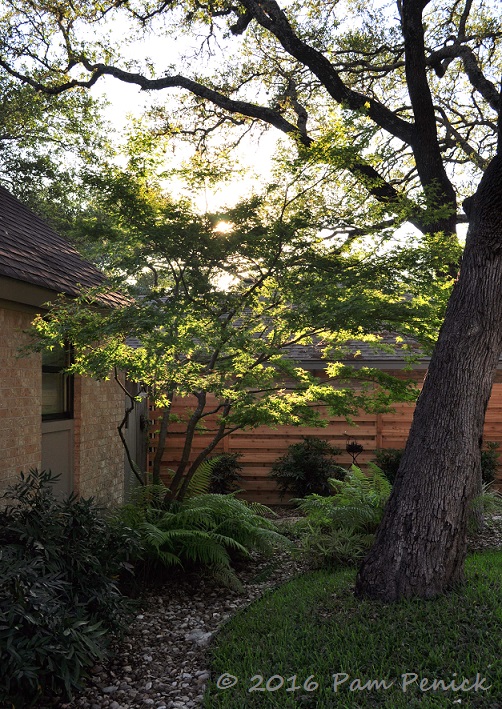
And now, “after” — or, more accurately, “in process.” No more street view. No more trash-bin view. A path for access. And lots of shade-loving, deer-resistant plants, planted in masses for continuity, that green up the side yard: Chinese mahonia, variegated flax lily (Dianella tasmanica ‘Variegata’), native river fern (Thelypteris kunthii), and shrubby Mexican honeysuckle (Justicia spicigera).
Side view “before”
And “after”
Next month, we’ll have been in this house for 8 years. (Here’s my very first post about it.) I’ve been working on the front side garden for all that time. Hey, Rome wasn’t built in a day.
I welcome your comments; please scroll to the end of this post to leave one. If you’re reading this in a subscription email, click here to visit Digging and find the comment box at the end of each post.
_______________________
Digging Deeper: News and Upcoming Events
Austinites and native-plant shoppers, I’ll be at the member’s day Fall Plant Sale at the Lady Bird Johnson Wildflower Center on October 14, and I hope to see you there! I’ll be signing books between 1 and 3 pm in the Wild Ideas gift shop. If you’re not a member, of course you can still come on out and see the gardens and stop in at Wild Ideas. Hope to see you there!
South Texans, come see me at the 2nd annual Planta Nativa festival in McAllen, Texas, on Saturday, October 22. I’ll be delivering the keynote talk, “Local Heroes: Designing with Native Plants for Water-Saving Gardens,” that evening. Tickets are on sale at Quinta Mazatlan. I hope to see you there!

All material © 2006-2016 by Pam Penick for Digging. Unauthorized reproduction prohibited.




Well done and a lucky break with the neighbor’s fence extension! We too see our neighbor’s bins and, while ours are hidden from neighbors by a hedge, they’re all too visible to us but I’ve yet to come up with a solution acceptable to my husband. (The easiest thing would be to stow them in the garage but that encroaches on his workspace…)
Keep thinking, Kris. I bet you’ll hit on the right solution eventually. How about a screen to shield them from view? Like this: https://www.penick.net/digging/?p=11011 —Pam
It’s hard to even tell it’s the same area! I love before and after shots, it looks so incredibly natural yet undeniably improved! Love this post!
Thanks, Wendy! —Pam
Just tonight I was thinking ill thoughts about the two neighbor’s whose bins are in my direct line of sight (I’m not a very nice person sometimes). Ours are bright obnoxious colors too, I wish the city had chosen something less harsh.
But on to the positive…your side yard looks fabulous!
I know your pain, each of my 4 neighbors store their trash bins and miscellaneous junk on my side of their property. Ugh!
Like leafy camo paint! That would be cool, eh? —Pam
Ah! The value of a borrowed view is large! When the neighbors resided their house and garage, it made a tremendous impact on my garden, too!
Oh man, re-siding makes a huge impact. My mom’s back porch looks out on a neighbor’s 2-story house, which they’d let go for years, until the siding was literally rotting off the house. Finally they re-sided, and it improved her view one-thousand percent. —Pam
A great improvement. A much better view any way you look at it.
Thanks, Lisa. —Pam
Looks very nice and such an improvement. The separation and the plants make it seem like the other house is further away which is always a plus. How often do you have to weed your mulch beds? When I walk our neighborhood, I see huge beautiful mulch beds but they have so many weeds that it looks like it is more work than mowing.
Almost never, Peter. Virginia creeper occasionally tries to sneak in, and I see an occasional ligustrum seedling (from trees all the way behind the house in the greenbelt), but otherwise I think the dry shade discourages most interlopers. Are you seeing mulch beds with Bermudagrass coming up in them? Bermudagrass is pure evil, and if you don’t eradicate it completely (with herbicide, in my opinion), it’ll keep coming back. In my lawn removal, luckily, I was dealing with St. Augustine grass, and it’s very easy to eliminate. —Pam
Wonderful transformation! Lucky you getting a free fence – I’ve been hoping one of our neighbors would do that but it looks like we will have to eventually foot the bill. I was quite surprised at how effective drawing lines for the pathway on the “before” picture was in helping to visualize how that would impact the space. I’ll have to try that.
It’s a fun way to experiment with different designs, Margaret. You can draw on images with easy computer tools in Microsoft Paint, or print photos on paper and draw on them, or print actual photos of your yard and draw on them with a Sharpie. You can try out a lot of different ideas that way before committing with the shovel. —Pam
I’m hard pressed to accept that the before and after/in progress photos show the same views! Wow, what a gorgeous transformation. Very impressive, Pam. Plus I think you’ve convinced me to write an ‘in progress’ post about a new section of the garden.
Thanks, Pat, and please do write an in-progress post too. It’s always encouraging to see how projects evolve in real-time for real people, plus it’s inspiring to see how people can use gardening to solve various problems. —Pam
So encouraging to see how well you have achieved that.
The afters look wonderful!
Thanks, Diana! —Pam
Such a wonderful post, full of details that make this post as interesting as the design is beautiful. It is nice to know there are other gardeners, like myself, who get an idea, begin a design, then add and change as they proceed. The link to your ‘new house’ post from 2008 was the icing on the cake. To see how you changed and improved, for your personal style, fortifies my belief in the major transitions I am undertaking. Texas limestone is so lovely.
I’m glad you enjoyed it, June. And yes, I’m so glad I took pictures when we moved in, before we’d done anything to the house or yard, so that one day I could look back and appreciate all the work we’ve done. Always take “befores”! —Pam